Pages

Monday, 22 July 2013

Chocolate chip and cherry scones


Recently I've been trying to do the impossible, I've been trying to cut down on my calorie intake. Anyone who knows me, knows that I have a really sweet tooth. Scones are popular with my friend who is diabetic because they don't have much sugar in them, obviously that does depend on what you put in them. I've used glacé cherries and chocolate but you could use almost anything or leave them plain.

Ingredients

225g (8oz) self-raising flour  
1 tsp baking powder  
25g caster sugar  
55g butter or margarine (I use Stork) 
6 tablespoons milk (and some for brushing)
100g dark chocolate finely chopped
100g glace cherries chopped


Preheat the oven to 220°C / gas mark 7.
Add all of the ingredients into a bowl and mux into a dough.
Knead the dough gently on a lightly floured surface and roll it out to around ¾ inch thick.
Cut into 2½ inch circles, space them out onto a greased baking sheet, brush with milk and pop them into the oven for 12 – 15 minutes.


When they’re browned and risen take them out of the oven and put them on a wire rack to cool.

Serve with clotted cream, or if like me you're trying to be good a low fat spread will have to do (but trust me these scones are tasty enough as they are).


Sunday, 21 July 2013

Baking class with John Whaite


I love a baking class, not only do you get to learn something but you get to make a mess in someone else’s kitchen, without the bother of cleaning up after.

I’ve been to a few different baking classes in the last few years; it’s where I learnt the different techniques for piping icing, working with fondant and the best way to separate eggs. A good baking class can really build your confidence and inspire you to push yourself futher.

For a while now I’ve been looking for a new baking class, something a bit different from the classic cupcake class. There seem to be two types of classes, classes for having fun and classes for serious learning. But what about people like me who want to learn and have fun?

This is where John Whaite and his baking classes come in. I went to John's Multi Bake Day a couple of weeks ago - a hands on lesson in macarons, madeleines and rough puff pastry palmiers - three things I have never made before.


As I’m sure you know, John was the winner of the Great British Bake Off 2012. He’s since gone on to study at Le Cordon Bleu so he’s definitely earned his baking stripes.

The class was set up specially for food bloggers and we started with introductions, I got to meet a great bunch - Laure (Les recettes de Lorette), Alex (The Broke Boy), Bea (BizziBeaBakes), Emily (My Gingerbread Journey) and Joanne (Bakes Cooks & Eats).


John's a great teacher, he put everyone at ease straight away. He's very down to earth and broke everything down into simple steps. He was really happy to answer all of the questions that we threw at him. I wasn't sure before I got there how involved in the classes John would be, was he just the face of the class or had he put it all together. Well not only had John organised everything but he'd roped in his partner Paul to be his assistant for the day.

It was a busy day of baking with a tight agenda pulled together by John but he kept energy levels up by fueling us with Prosecco and sweets.

John shared all of the recipes with us at the end of the class and I am going to blog about my progress separately over the next few weeks as I attempt them all on my own at home. I've already been out and bought myself a new madeleine pan in preparation.


It was a privilege to be a student at John's very first baking class and I would recommend it to anyone who enjoys baking and wants to learn something new (and have some fun doing it).

You can find information on all of the upcoming classes here on John's official website, I've got my eye on the Christmas Gingerbread House Class later in the year.


Sunday, 14 July 2013

A trip to the beach and a summer themed bake.

How glorious has the weather been this weekend?

I made the most of the summer (we can't guarantee how long it will last) and took a day trip to Hayling Island today.

I've resolved to move there one day and buy one of these cute beach houses.


This glorious weather reminds me of a recent bake which was for June's Clandestine Cake Club. The theme was Summer Feeling.

For me, Summer and food is all about picnics and eating al fresco. The ideal picnic for me would be similar to afternoon tea - sandwiches, scones with jam and cream and then cake of course.

I wanted to create a bake which incorporated all three. So I made a Victoria Sandwich with lashings of jam and cream in the shape of a sandwich. I used this silicon pan from Lakeland.

I used a classic Victoria Sponge recipe taken from here.


Delicious!

Friday, 12 July 2013

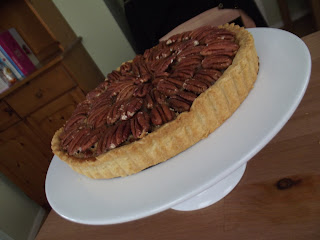
Pecan Pie Day


Did you know that 12th July is National Pecan Pie Day in the states? No, neither did I but when I heard I couldn’t resist making one.  Pecans aren’t cheap so you want to make sure you get it right and this simple recipe is a safe bet.

For the pastry
200g plain flour
50g caster sugar
1/8 tsp salt
115g margarine
4 tablespoons double cream (leftover cream can be whipped up and served with the finished pie)

For the filling
400g pecans
3 eggs
200g soft light brown sugar
150ml golden syrup
50g margarine or butter, melted
1 tsp vanilla extract
2 tbsp plain flour

To make the pastry
  1. Combine the flour, sugar and salt in a food processor. Cut the margarine into squares and add to the dry ingredients and mix well. If you don’t have a food processor you could use an electric whisk.
  2. The mixture should now resemble breadcrumbs. Add the cream and mix until the dough comes together and can be formed into a ball. If the dough is too dry you can add an extra tablespoon of cream.
  3. Wrap the dough in clingfilm and chill in the fridge for 30 minutes (no longer, or it will become too firm).
  4. Lightly flour your work surface and your rolling pin and roll out a circle. My tart tin is 9 inches so I roll out the pastry to approx 11 inches.
  5. Press the pastry gently across the side of the tin and trim any excess, leaving approx ½ inch spare around the edges to account for shrinkage.
  6. Lightly prick the bottom and sides with a fork, put back in the fridge for another 30 minutes.
  7. While waiting for the pastry you can either put your feet up and have a cup of tea or start making the filling following the instructions below.
  8. The next step is to blind bake the pastry. Preheat the oven to 220°C and leave a baking sheet in the oven to heat up. We will put the pie tin on the hot baking sheet and this will help the pastry to cook evenly and stop the pie from getting a dreaded soggy bottom.
  9. Line the tart pastry with baking paper or foil. Fill the pastry with baking beans to keep the pastry from puffing up and shrinking.
  10. Put the pie in the oven, after 15 minutes remove from the oven and carefully remove the pie weights and foil. Put it back in the oven and back the pastry case for a further 5 minutes or until light golden brown.
  11. Reduce oven temperature to 170 °C.

To make the filling

  1. Put approx. 150g of the pecans to one side, you will need these for decoration so pick out the nicest looking, whole pecans. If you have any broken ones they can go in the filling.
  2. Melt the margarine and leave to one side. In a separate bowl whisk the eggs. Then add the sugar, vanilla, flour, syrup and melted margarine and whisk again. Finally stir in 250g pecans.
  3. Pour the mix into the pastry case and then decorate with the remaining pecans on the top. Bake in the oven for 30 minutes, if the pie starts to look a bit brown you can cover with tin foil to avoid burning.
  4. When ready, remove from the oven and leave to cool on a wire rack.

Best served warm with whipped cream; you should hopefully have some cream leftover since we didn’t use that much in the pastry.

Enjoy!


Tuesday, 9 July 2013

The most amazing birthday cake and meeting Jo Wheatley


It was my birthday just over a week ago and the thing I was probably most looking forward to was my birthday cake. Weeks and weeks ago my best friend Francesca said she wanted to make me a cake and she certainly didn't disappoint.

Apparently she started with the idea to make a sheep cake pop and the farm scene cake developed from there.


The cake was made up of sheep, pig and chicken cake pops. The pigs and sheep were living in a chocolate fudge cake pen with curlywurlys for the fence. The chicken coop was made of biscuits with mini fudge chunks for chicken feed. Oh...and if you're wondering the grass was buttercream with a special Wilton nozzle. Everything was edible.

On my birthday weekend a group of us went to Wisley Gardens for their annual Garden Party. The weather was beautiful and we enjoyed a picnic on the lawn. Jo Wheatley, winner of 2011's Great British Bake Off was there to do a Q&A and book signing. My friend Becca who works at Wisley bought me the book as a birthday gift and had it signed too.


The Q&A was really interesting, Jo talked about her experience on the Great British Bake Off including her nerves on the first day when she saw how good all the other contestants were. She was asked what her favourite cake is and she answered the classic Victoria Sponge as you can adapt it in so many different ways with different fillings.

It was really nice to hear that Jo has maintained a good friendship with Mary Berry since the show. She seemed absolutely lovely and I can't wait to start baking from her new Home Baking book, available exclusively at Sainsburys.

Sunday, 30 June 2013

Peanut Butter Slutty Brownies


I first heard about slutty brownies through a friend who was raving about them being the best brownie in the world. Of course I googled them and found out how to make them from this great blog from The Londoner - http://www.thelondoner.me/2011/06/slutty-brownies.html.

Slutty brownies get their name because they are so easy to make and oh so naughty. Made up of a layer of cookie, a layer of Oreo cookies and a layer of brownie, it doesn't get much more indulgent than this!


Generally they are made with cookie and brownie mix but I much prefer to make it all from scratch. I adapted one of my favourite cookie recipes which I got from Jo Wheatley's book A Passion for Baking and I took a Brownie recipe from here and adapted it slightly.

Start off making the cookie batter

You'll need:
100g margarine
100g peanut butter (I use crunchy but you could use smooth)
60g demerera sugar
60g caster sugar
1 egg
100g plain flour
1/2 tsp baking powder
1/2 tsp bicarbonate of soda
60g dark or milk chocolate, roughly chopped

Grease a square cake pan. My pan is approx 8x9 inches and was perfect size.

Beat the margarine, peanut butter and both sugars together until flight and fluffy. Beat in the egg. Add the flour, bicarbonate of soda and baking powder and mix until combined and the dough comes together. Add the chocolate last.

Pop the cookie batter in the cake pan and bake for approx 20 minutes in an oven at 180ºC, 160ºC fan oven, Gas Mark 4. You want the cookie batter to be baked, even though it's going to go back into the oven it won't be overcooked and will stay gooey.


While the cookie is baking the oven you can start on the brownie mix.

You will need:
55g margarine
140g plain chocolate
3 eggs
225g caster sugar
1 tsp vanilla extract
40g plain flour
1 tsp baking powder
25g cocoa powder
55g creme fraiche
200g peanut m&ms (frozen)

First, melt the margarine and chocolate over a bain-marie. In a seperate bowl whisk the eggs, sugar and vanilla together. Stir in the melted chocolate and whisk. Whisk in the flour, baking powder and cocoa powder. Add the creme fraiche and one third of the m&ms.

Once the cookie is ready, remove from the oven and turn the oven down to 170ºC, 150ºC fan oven, Gas mark 3. Now lay the oreo cookies on top of the cookie before adding the brownie mix.


Sprinkle another third of the m&ms on the top before putting in the oven.


After 30 minutes in the oven, remove the brownie and sprinkle the final third of m&ms on top and put back in the oven.


Leave in the oven for another 20-25 minutes.


Leave to cool thoroughly on a wire rack before removing from the pan and cutting into squares.


This makes 12 generously sized brownies. I like them enough just on their own but you may want to eat them warm with ice cream mmmm.


Sunday, 9 June 2013

A boozy bake for Father's Day - Guinness Cake with Baileys Icing


We've never really celebrated Father's Day in my house. Not because we're mean but because my dad's never really wanted to.

However one day when I have kids of my own we'll celebrate Father's Day and I can't think of a better gift than a home baked cake.

Guinness cake is probably my favourite cake in the world and because of the booze it always appeals to the men in my life. I think it's the perfect bake for Father's Day.

This isn't your standard sponge cake, the mix is very wet but don't worry it will bake all the way through eventually. It also doesn't rise much and stays quite flat so don't worry if it's already almost filling the tin before you bake it. I use an 9 inch springform tin which is the perfect size.

Here's the recipe which I've taken from Nigella.com and slightly adapted.

Ingredients
250ml Guinness
250g margarine
75g cocoa powder
400g caster sugar
150ml sour cream
2 eggs
1 tsp vanilla extract
275g plain flour
2 1/2 tsp bicarbonate of soda

Method
1. Grease and line an 8 inch round cake tin.
2. Melt the margarine (I prefer to do this in the microwave but you can also melt in a saucepan or in a bain-marie).
3. Mix the Guinness with the melted margarine.
4. Whisk in the cocoa powder and sugar.
5. In a seperate bowl beat the eggs, sour cream and vanilla together and then add to the Guinness mixture.
6. Pour into the cake tin and bake in the oven for approx 45 minutes - NB I find that generally cooking time varies from oven to oven so just keep an eye on it and test it is cooked all the way through by inserting a cocktail stick into the centre. If it comes out clean the cake is ready to come out of the oven.
7. Leave the cake to cool in the tin on a wire rack.

This cake doesn't really need icing as it's so moist but if like me you think a cake seems naked without a bit of icing I recommend this recipe for Baileys icing.


Ingredients
225g cream cheese
125ml Baileys
300g icing sugar

Method
Whisk the cream cheese, sieve in the icing sugar and mix well until combined. Whisk in the Baileys. If the mixture is too runny you can add more icing sugar.

Smother over the cake and enjoy.


You can also make this cake in two smaller tin (8 inches),
sandwiching them together with the cream cheese icing